Table of Content
Designating the network as public or untrusted ensures other devices on the network cannot access your PC. When using a public Wi-Fi hotspot, we recommend keeping your connection public. You must be logged in as an administrator to change your network from public to private or vice-versa.

It’s automatically turned off for public networks, so when you turn it on, it changes the network to a private network. Then click Change advanced sharing settingsto open Advanced sharing settings page where you can change the network discovery settings for each of the network locations. Since Windows 7, you must choose a network location when you connect to a network for the first time, either Home, Work, or Public. This automatically sets the appropriate firewall and security settings for the types of the network that you connect to.
Change from Public to Private Network in Windows 7, 8 and 10
Perhaps there is a patch so I can change a network to public so it will show as private when it is configured as private in the registery tab. I have recently helped out with a relative's Windows 8.1 laptop in a new home, where he had chosen "Public" for his WiFi connection to his new router. To get him out of this pickle, the above instruction's "Find devices and content" option simply wasn't there, as other commenters below the YouTube video have sometimes noticed. And his account was not an administrative user. So, file sharing and network discovery will be enabled by default. As you can see, Windows 8.1 uses a private network (if you clicked "Yes" when setting up Windows 8.1) or a public network otherwise.

Changing any of the settings in each of location profile is not recommended, unless you know what you are doing. As a last resort, if you can’t change the network location using the methods above, you can manually change the network location using a tool called secpol.msc. This will not work on the Home, Student or Starter editions of Windows. In Windows, press the Windows Key + R, which will bring up the Run dialog box.
How to Change Your Network From Public to Private
HomeGroup is not available on public networks, and network discovery is turned off. Sometimes Windows detects a private network as a public one and vice versa. You can manually make some changes to ensure that you are not accidentally sharing either too much on a public network or blocking all sharing on a private network. You can use Get-NetConnectionProfile cmdlet to find out the active network and pipe through to Set-NetConnectionProfile to change the current network profile. For example, the following command changes the current active network profile to Public.

There is also an option in Windows 7 to treat all future networks as public networks automatically, though I don’t think most people would find that useful. Here, you will see an overview of your network connection. Under View your active networks, you’ll see the name of the Ethernet or WiFi network and it should have a link underneath called Home network, Work network or Public network. In Windows, when you connect to a wireless network, it will either register it as a Public network or a Private network. Private networks are basically home and work whereas public networks are anywhere else, which you don’t trust.
Method one. Change network access type via the Control Panel and Settings app
Here you will see the network you are connected to and what type of network Windows 8 has identified it as. First, right-click on the network icon in the Windows 8 system tray and click on Open Network and Sharing Center. Now click on Network and you’ll see the list of connections, i.e Ethernet, Wireless, etc. When you connect to a network through an Ethernet cable, the process is slightly different. You can also use this alternative method when connected via Wi-Fi.
Pick the right location when connecting to a network to ensure that your computer is always set to an appropriate security level. I am trying to change my wireless network profile from public to private, but cannot for the life of me figure out how... I can’t get a VPN setup, and I waste most of my time with a limited connection that I NEVER seen until windows 8. All because what I can figure is so someone can have backdoor into he OS, or they don’t want people to be able to access any of the settings in the system even in the registry. Ever found yourself with a Windows system that just won't let you browse the local network? If you're on a public connection, like at an airport or hotel WiFi, you'd expect this behavior, a good thing.
If this setting is disabled (Off/gray), Windows 8.1 uses a public network. To verify that the network location type used by Windows 8.1 is correct, right-click "Open Network and Sharing Center". The options available on Windows 8.1 have changed names from those shown when installing Windows 8, but the technique is the same. Could say I’m just pissed that I can’t get it to work with anything that I can find, or at least as reliable as the systems of the past.
Answer "Yes" to use a private network and benefit from Windows file sharing, ... Double-click on it and click on the Network Location tab. Here you can manually change the network location from Private to Public and vice versa. I do find it interesting to say the least the things I don’t like about Ubuntu are nearly identical to the same issues with windows when it comes to connectivity, and getting things to work properly. The only advantage I see with windows is that it is much easier to get printers, scanners, and a number of other devices to work with it. Just as in Mac OS, as it is not too different than unix at the core, just the interface is different.
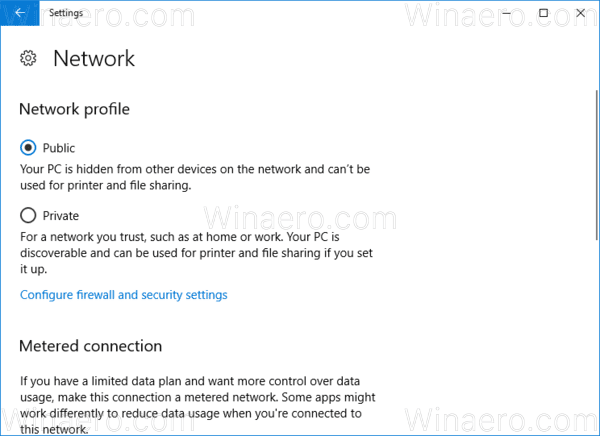
This article explains how to change a network from public to private on Windows 10. Designating a connection as private makes it discoverable to other devices, so only do this for networks you trust. The default settings in each of the network profile are the best practice in each of the scenario.
When you click on the network, you will now be able to select Public or Private. Select the Windows Start Menu and choose Settings. Ryan Perian is a certified IT specialist who holds numerous IT certifications and has 12+ years' experience working in the IT industry support and management positions. Home Entertainment Whether you want to build your own home theater or just learn more about TVs, displays, projectors, and more, we've got you covered.
Go ahead and right-click on that and choose Turn sharing on or off. This is why I don’t like to have the root user disabled in the OS that I’m running, as I hate things I can’t modify. Do this only at your own risk, as it's really only for folks who are comfortable editing their registry using regedit.exe, have full Administrator access, and are willing to reboot after making the change. From what I can tell you just go to network section through the charms bar then click on the network you need to change "first picture".
As you can see above, my network is considered a Private network, which is correct since I’m at home and connected via Ethernet. If this is incorrect, there are a couple of things you can do. First, you can click on Change advanced sharing settings in the left-hand pane.


No comments:
Post a Comment